Saturday

How To Reduce Pc Start Up Time by 3 Methods .........


In this faster world, we wouldn't like to spend our time by sitting in front of the computer for switching it ON, wait for booting, get angry at a slow start up, then refreshing to a 100 times...In the case of internet we want to make web pages loads more faster...In other words we think seriously about time and is precious for us.
Now i will tell you the process of reducing your PC boot-up time - A time conserving idea. There are several places to tweak the settings for optimizing windows booting and start up time.

To Reduce Computer Start Up time :

1. BIOS TWEAK
 STEP 1:   Turn on your computer (cold start).
 STEP 2:   Enter the BIOS settings screen by manufactures suggestion.Click here to know your BIOS info.(common method of entering into bios is pressing DEL key)
 STEP 3:   Look for the boot settings menu and press enter. There you will find an option such as QUICK BOOT-turn it on. This will avoid certain memory/hardware tests during start up time.
STEP 4: Find an option for BOOT DEVICE PRIORITY, and then select hard disk as your first boot device.
STEP 5: Save and exit BIOS setup.

2. WINDOWS TWEAKS
Configure start up programs
STEP 1: Click start>>Run
Type msconfig then press enter. this opens system configuration utility.
STEP 2:
In startup tab you will find will find the programs that loads when your computer starts. These may include antivirus programs, sound utilities, video driver utilities ect. In most cases, there will be a huge no. of unwanted programs that came from the installed programs such as Nero, power DVD etc.. THIS MAY BE THE MAJOR CAUSE OF SLOW DOWN OF COMPUTER IN START UP. Disable the useless startup entries.

Note: Do not disable video driver, sound driver and anti-virus utilities.

STEP 3:
In system configuration utility under services tab check “Hide all Microsoft services”. this will shows the services that installed with applications that eat considerable memory. Disable un-wanted services then click apply. restart computer.

3. HARDWARE CHANGES
As all you know adding an extra RAM will increase the pc speed as well as the boot speed of the pc.Also a faster hard drive say 7200 rpm HDD will also help to improve many speed parameters.
There are so many other tweaks but these are the most important that you consider.

Friday

Download Android Apps For FreeAndroid Apps For Free Download ........

Android application is developed by Google is most widely used application in entire world.It has more than 450,000 application in Android market.Some apps are free,some are of trial or demo version but most of the useful apps are paid to get.And buying all application is not possible to all android follower.Hence i found two very great apps which able you to download and install paid android apps free of cost.These two apps are Applanet and Blackmart.Install any apps from given two apss and enjoy free paid apps download free

Enable Device To Download Apps Free From Unknown Source

This step is very important for download paid android apps free,You just need to enable installation of application from unknown source from your device.If you have not enable the option,firstly enable this option and then move to below steps

An Android device is set to block installation of applications from unknown sources.Here unknown means another source than Android Market.It means it block apps which is buying or downloading from other source than Android Market.Just follow below steps and enable installation of application from unknown source

TRICK:

1.Click On Menu Button Your Phone Screen

2.In Menu Option,Go To ''Settings'' Option

3.Now Go ''Application'' tab

4.Now Click On Unknown Source Option

Install Android Apps Using ApplanetInstalling Applanet apps is very easier.Download Applanet appand enjoy free Android Market download app and transfer it in your device via any transferring substance. Now run the app and download free apps on the move.Applanet has more than 10,000 apps in its database.Download full android apps and pay nothing for it.It also look like Android Market {Google Play}

Install Android Apps Using BlackMartBlackmart is also similar to Applanet.Just download BlackMart AppNow allow installation from unknown source option and install the app.Transfer it via any transferring substance and run it.After running it just look like Android Market.Now you just have to download apps,sorry unlimited apps free of cost,without giving a single penny and download as much Android apps you want on the grove.Download any game and apps from Blackmart

Vodafone working trick to use free GPRS 3G2G


Today I going to post trick of Vodafone which working and tested in most of the states in India,

So here we go,

Advantages:

*Unlimited browsing and downloading
*Unlimited bandwith
*Supports Torrents
*Your IP address is hidden
*You can access blocked sites
*Resume Supported
*Unlimited parallel Downloads
*Just like paid net

Trick:

Register at kebrum by clicking here and activate your account

Download OPEN VPN software by clicking here

Then download these configuration files by clicking here 

Paste the configuration which you downloaded in C-Program filesOpen VPNConfig Now in config find the Pass.txt file and put your email id and password which you used to register At kebrum site
Connect with potalnmms access point
Now launch OPEN VPN from desktop shortcut
Now right click on open vpn icon and click connect
Enjoy, Keep visiting for more working tricks

How To Recover Your Computer After Virus Attack ..............


Hi guys,Whenever your pc infected by virus.Even after the virus is totally removed from the system, some users find it difficult to restore all those things back which were affected by the virus. A virus usually when enters into a system disables the registry editor and task manager so that the user can not remove the virus from the system.

Here is a free tool Re-Enable using which even a novice users can fix all the things which were disabled by the virus. An antivirus can remove the virus files but sometimes it may fail to restore the system settings. In such situations this tool can come handy.
The program has the ability to restore functionality to these Windows features

 * Windows Registry
* Command Line Tool
* Windows Task Manager
* System Restore Config
* Folder Options
* Run command
* My Computer
* Task Scheduler
* Right Click Context menu
* Ms-Config (Xp only)
* Control Panel
* Search

You will require dot net 3.5 or higher version to run this software. Or if you don’t want to download .Net framework then you can try the portable version of this software.

Wednesday

How To Disable (or) Enable Logo GUI Boot On Windows 7 Startup .........

When the Windows 7 operating system is booting up, it displays to the user an animated graphical Windows logo. Loading and displaying this logo adds a few seconds to the Windows 7 startup time, so disabling it will shave off these seconds. The downside? The screen is black while Windows loads, and if users are uncomfortable with that, then it is not a good idea to disable it.


The logo really has no added value or benefit to display other than letting the user know Windows is loading. If you have tweaked your system to a comfortable level, and you are comfortable not seeing this image anymore, then it is safe to disable. 

Personally, it was tougher for me on Windows 7 than their other operating system, mostly because the Windows load GUI was more fun to look at than it's predecessors.


Disable The Logo GUI Boot On Windows 7 Startup:

1. Select the Windows 'Start' button.

2. In the search box, type 'msconfig'.


3. Scroll up and right click on the program.

4. Select 'Run As Administrator'.


5. When the system configuration utility is loaded, select the 'Boot' tab.


6. Check the box titled 'No GUI Boot' at the bottom center of the form.


7. Click 'Apply'.

8. Select 'Ok'.


9. Restart your computer.

There is a niche startup speed community that will have a special appreciate for this tip. Some users simply love to get their computer to boot as quickly as possible, sometimes even running a stop watch to monitor their changes in startup performance. I'm not one of those people... 

For  More see The  Following Video:

Sunday

How to Boost the Speed of Broadband Internet Connection in Windows...........

 To Know How to Boost the Speed of Broadband Internet Connection in Windows...........


Click Here:  My Another Blog :

http://techtipsadda.blogspot.in/?view=classic

Dont Extract This 42 KB Zipped File! .......


The file contains 16 zipped files, which again contains 16 zipped files, which again contains 16 zipped files, which again contains 16 zipped, which again contains 16 zipped files, which contain 1 file, with the size of 4.3GB.


So, if you extract all the files, you will most likely run out of space as it ends up with a file size of 45 PetaBytes(PB)
(1 Peta Byte = 1,000,000,000,000,000 Bytes)

Here is the calculation: 


16 x 4294967295  = 68.719.476.720 (68GB)
16 x 68719476720      = 1.099.511.627.520 (1TB)
16 x 1099511627520    = 17.592.186.040.320 (17TB)
16 x 17592186040320   = 281.474.976.645.120 (281TB)
16 x 281474976645120  = 4.503.599.626.321.920 (4,5PB)

You might be wondering how can such a large file be compressed to 42KB.
This is made possible by the high statistical redundancy of the 4.2GB file as it contains only zeros in needless repetition. Exploiting this statistical redundancy, compression algorithms are able to compress the file data more concisely into a 42KB file.


Click here to download 42.zip (42374 bytes zipped file)


Don't dare to Extract it!!


What is an NZB file ? ..

The NZB file is the short form for newzbin file with an extension of .nzb; Newzbin.com invented the NZB file. The file contains a list of pointers to the parts of the file which the users can download from their ISP’s Usenet server(also referred as NNTP servers). The file is based on the XML file format for retrieving the data from Usenet Server.


When large file on the Usenet Newsgroup server is placed or posted then the file is divided into multiple messages known as segments. Each Usenet consists of a unique identifier called the "Messenger ID" and each Segment has its own unique message ID for easy identification of the file. The NZB file capable client reads the Message ID from the file and decodes it after downloading. The message is decoded back in the binary file format by using yEnc or Uuencode. This method helps for quick retrieval of file and makes it easy for the user to download it at faster speed without wasting much time.
    

Once the entire sub sets of files are downloaded, the files can be opened by software like the SuperNZB for speedy retrieval. The main advantage of using SuperNZB is that it ignores any kind of macros in the file.

The search capable websites prefer to use NZB because these websites create NZB files out of the data which is needed to be downloaded. Most of the sites prefer to opt for NZB as they are quick and easy to download, have more efficient bandwidth and they can easily format data rather than web pages.


Try it yourself and post in your valuable comments.


Most Commonly Used Internal and External DOS Commands ...............


DOS Commands

DOS Commands are instructions to perform tasks on files and directories. They are case insensitive. And as you already know, file is the area where we store group of information or data, and collection of group of files is called a directory.

In MS-DOS the file name follow 8dot3 format and is divided into two parts - primary name and secondary name. Primary name is up to 8 characters long and secondary name is up to 4 characters with dot. For example, in the image file-name Logo.jpg, Logo is the primary name and .JPG is the secondary name. Secondary names are fixed for particular type of file, meaning for system files the secondary name is designated as .sys, for text files it is .txt and so on. Here is the list of some of the important types of files with their default secondary names:


Text file.txt
Command file.com
System file.sys
Programme file.prg
Database file.dbm
Library file.lib
Batch file.bat
Executable file.exe

DOS Commands are divided into 2 types:
  1. Internal Commands

    These are for performing basic operations on files and directories and they do not need any external file support.
  2. External Commands

    These external commands are for performing advanced tasks and they do need some external file support as they are not stored in COMMAND.COM

Cursor gives our position.

In MS-DOS, keyboard shortcuts involving handy ones like Functional keys, arrows along with ESC are of great help for recalling to searching to clearing command line etc., Here are few of them:

  • UP (↑) and DOWN (↓) arrows recall previously entered commands.
  • ESC clears the present command line.
  • F7 key displays command history and ALT+F7/ESC hides it.
  • F9 is used to selects a command by number. Just enter the command number and it fetches the command line for you.

Most Commonly Used Internal DOS Commands

  1. DATE

    This command is used to display the system current date setting and prompt you to enter a new date. The syntax is: DATE  [/T | date]


  • If you type DATE without parameters then it displays current date and prompts to enter new date. We should give new date in mm-dd-yy format. If you want to keep the same date just Press ENTER. DATE command with /T switch tells the command to just output the current system date, without prompting for a new date.
  • 2.TIME 
  • This command is used to displays or set the system time.
    The syntax is: TIME   [/T | time]


  • Same as DATE command, typing TIME with no parameters displays the current time and a prompt for a new one. Press ENTER to keep the same time. TIME command used with /T switch tells the command to just output the current system time, without prompting for a new time.
  • 3.COPY CON

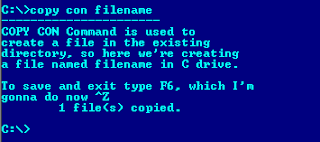
    It is used to create a file in the existing directory. Syntax is: COPY  CON filename after that press Enter and start typing your text and after you're done typing your text, to save and exit hit F6 key.


  • 4.TYPE

    This command is used to display the contents of a text file or files. The syntax is: TYPE   [drive:][path]filename
    Now, lets try to display the contents of the file named filename we've created earlier using COPY CON command. 


    5.CLS

    It is used to clear the screen. Syntax is CLS


  • 6.REN

    This command is used to change/modify the name of a file or files.
    Syntax is: REN   [drive:] [path] filename1   filename2.

    Here, filename1 is source file for which you wanted to change the name, and filename2 will obviously becomes your new file name. Also note that you cannot specify a new drive or path for your destination file.
  • 7.DIR

    This command displays a list of files and subdirectories in a directory. Syntax is: DIR   [drive:]  [path]  [filename] [/A[[:]attributes]]  [/B]  [/C]  [/D]  [/L]   [/N]  [/O[[:]sortorder]]  [/P]  [/Q] [/S]  [/T[[:]timefield]]  [/W]  [/X]  [/4]

    Here,
    [drive:][path][filename]Specifies drive, directory, and/or files to list.
    /A:attributesDisplays files with specified attributes. The possible attributes are as follow: D → Directories, R → Read-only files, H → Hidden files, A → Files ready for archiving, S → System files, - Prefix meaning not
    /Bdisplay in bare format with no heading information or summary
    /CUsing this attribute with dir by default displays the thousand separator in file sizes. To disable display or separator use /-C
    /DDisplays file list sorted by column.
    /LUses lowercase in listing file names and sub-directories.
    /NDisplay in new long list format where filenames are on the far right.
    /O:sortorderDisplays list by files in sorted order. The sortorder attributes are as follow: N → By name (alphabetic), S → By size (smallest first), E → By extension (alphabetic), D → By date/time (oldest first), G → Group directories first, - Prefix to reverse order
    /PDisplay page wise pausing after each screenful of information and prompts to press any key to continue.
    /QDisplays the owner of a file or files.
    /SDisplays files in specified directory and all subdirectories. Bear caution in using this in your root directory as you may end up in overflowing information. To stop the screen overflow at any point hit Pause-Break key.
    T:timefieldThis sorts and displays the list based on time field specified. C for Creation, A for Last Access, W for Last Written
    /WDisplays list width wise or wide list format.
    /XThis is used to display the short names generated for non-8dot3 file names.

  • Note that switches may be different in the DIRCMD environment variable, in which case just override present switches by prefixing any switch with - (hyphen), for example instead of using /P use /-P
  • PATH

    This command displays the path that how we have come to the present position or sets a search path for executable files.
    Its Syntax is PATH  [[drive:]path[;...][;%PATH%]]

    Typing PATH without any parameters displays the current path under current directory. Typing PATH ; clears all search-path settings and direct cmd.exe to search only in the current directory. And including %PATH% in the new path setting causes the old path to be appended to the new setting.
  • VER

    This command displays the version of the Microsoft Windows running on your computer.

  •  

    10.VOL

    It displays the disk volume label and serial number, if they exist for the drive specified. If no drive is specified it displays for the active drive.
    Syntax is VOL  [drive:]


  • 11.DEL/ERASE

    Used to delete one or more files.
    Syntax is DEL   [/P]   [/F]   [/S]   [/Q]   [/A[[:]attributes]] names
    Here,

    tr>
    namesSpecifies a list of one or more files or directories. Wildcards * and ? may be used to delete multiple files. * indicates group of unknown characters whereas using wildcard ? in file-names is for single unknown character. And using this command if a directory is specified, all files within the directory will be deleted.
    /PPrompts for (Y)es/(N)o confirmation before deleting each file.
    /FUsed to force delete read-only files.
    /SDelete specified files from all subdirectories. If Command Extensions are enabled DEL and ERASE change while using /S switch such that it shows you only the files that are deleted, not the ones it could not find.
    /QDelete in quite mode and do not ask if ok to delete on global wildcard
    /A:attributesDelete files based on specified attribute. The attributes are: R for Read-only files, S for System files, H for Hidden files, A for files ready for archiving and - Prefix meaning not.
  • 12.COPY

    This command is useful in copying one or more files to another file or location. Syntax is COPY   [/D]   [/V]   [/N]   [/Y | /-Y]   [/Z]   [/A | /B ]   source [/A | /B]   [+ source [/A | /B] [+ ...]]   [destination [/A | /B]]
    The different switches that can be used with this command as follow along with their use.

    sourceIt specifies the file or files to be copied.
    /AIndicates an ASCII text file.
    /BThis switch indicates a binary file.
    /DThis allows the destination file to be created with decryption.
    destinationThis specifies the directory and/or filename for the new file or files.
    /VHelps to verify new files to be written correctly.
    /NSpecifying this switch uses short filename, if available, when copying a file with a non-8dot3 file name.
    /YIf destination file already exists, this switch suppresses prompting to confirm you want to overwrite it and does it asap.
    /-YContrary to above switch, this causes prompting to confirm you want to overwrite an existing destination file.
    /ZCopies networked files in restartable mode.

    For appending multiple files for source use wildcard or file1+file2+file3 format and make sure to specify a single file for destination.
  • 13. MD, CD and RD

    • MD (or MKDIR) command stand for make directory and it is used to create a directory.
      Syntax is MD   [drive:]path
    • CD (or CHDIR) stands for create or change directory and it allows to display the name of or change the current directory or rather we can say come out of a directory. Syntax is CD   [/D]   [drive:][path]
       Typing CD drive: displays the current directory in the specified drive. This CD (or CHDIR) command does not treat spaces as delimiters due to which it allows to CD into a subdirectory name that contains a space without surrounding the name with quotes.
      For example:
      CHDIR \program files\mozilla firefox
      is the same as:
      CHDIR "\program files\mozilla firefox"

       If you type CD without any parameters it displays current drive and directory. CD.. specifies that you want to change to the higher directory in the current path. Whereas, using CD\ you can directly change to parent/root directory from any location in the current drive.

      Using /D switch changes current drive in addition to current directory for a drive.


      • RD (or RMDIR) command removes or deletes a directory. There are two conditions to remove any directory - (1) Directory to be removed should be empty. and (2) We should be outside the directory we are commanding to delete.
        Syntax is RD   [/S]   [/Q]   [drive:]path
        Here, using the switch /S removes a directory tree meaning it removes all directories and files in the specified directory in addition to the directory itself. And using /Q is the quiet mode that doesn't asks for ok approval to remove a directory tree.

    Most Commonly Used External DOS Commands

    1. EDIT

      This command is used to modify or change the data of a file.
      Syntax is EDIT  [/B]  [/H]  [/R]  [/S]  [filename(s)]

      Using switch /B you can force the edit in monochrome mode. /H displays the maximum number of lines possible for your system hardware. Whereas using /R and /S one can load files in read-only mode and force the use of short filenames respectively. [filename(s)] is used to specify file(s) to go edit. You can use wildcards (* and ?) to specify multiple files.
    2. XCOPY

      This command is used to copy files and directory trees from one disk to another disk.
      Syntax is XCOPY   source   [destination]   [/A | /M]   [/D[:date]]   [/P]   [/S [/E]]   [/V]   [/W]   [/C]   [/I]   [/Q]   [/F]   [/L]   [/G]   [/H]   [/R]   [/T]   [/U]  [/K]   [/N]  [/O]   [/X]   [/Y]   [/-Y]   [/Z]  [/EXCLUDE:file1[+file2][+file3]...]
    3. LABEL

      It is used to create, change, or delete the volume label of a disk.
      Syntax is LABEL    [drive:]  [label]
      LABEL  [/MP]   [volume]   [label]


      Here, [drive:] is for secifying the drive letter of a drive to be labelled and [label] specifies the label of the volume disk. [/MP] is used to specify that the volume should be created as a mount point and [volume] is used to specify volume name, usually mentioned after drive letter followed by colon and then giving volume name required.
    4. CHKDSK

      This command is used to check a disk and display a status report with properties of disk like serial number, volume label, memory and other properties along with errors on the disk if any.
      Syntax is CHKDSK   [volume path]   [/F]   [/V]   [/R]   [/X]   [/I]   [/C]   [/L[:size]]

      [volume path] is where you specify the drive letter followed by a colon and volume name to be checked. using /F switch allows you to fix errors on the disk. /V display full path and/or cleanup message if any. /R is used in tandem with /F and used to locate bad sectors and recover readable information. If you wanted to perform a less vigorous check of index entries on the disk then the right option is to use /I or /C rather then /R as they skip checking of cycles on the volume and helps in reducing the amount of time required to run chkdsk. Using /X forces the volume to dismount first before checking is performed. /L:size is all about specifying the log file size in kilobytes.
    5. TREE

      This command is very useful to view the list of directories and subdirectories present on the disk in graphical form. If you wanted to include files also with directories and subdirectories, then you'll have to give the command line as tree/f which presents the tree view of all the content on your disk. Here is the syntax for this command with allowed switches:
      TREE   [drive:path]  [/F]  [/A]
      In case you wanted use ASCII instead of extended characters, then go ahead include /A in the command line.
    6. DELTREE

      This command is used to remove a directory along with its contents.
      Syntax is deltree [drive:path]
      here, [drive:path] specifies the directory name to be deleted. All the subdirectories and files in this directory will be deleted without prompt and there's not getting back. So, keep caution while using this command.
    7. DOSKEY

      This command is generally used to edits command lines and recalls commands.
      Syntax is DOSKEY  [/REINSTALL]  [/HISTORY] [text]

      Here, /REINSTALL installs new copy of doskey, /HISTORY is used to display all previously given commands stored in memory. And [text] specifies the commands you want to record.
    8. FIND

      This command searches for a specific text string in a file or files. Syntax is FIND   [/V]  [/C]  [/N]  [/I]  [/OFF]  "string" [[drive:][path]filename[ ...]]

      The basic essential elements in the command line for find are - the string enclosed in " " and [[drive:][path]filename(s)]. String specifies the text string to find in the file and [[drive:][path]filename(s)] specifies the file or files where the text string search is to be done. If a path is not specified, FIND searches the text typed at the prompt or piped from another command. When you append /OFF in the command line, it searches and finds even those files with offline attribute set. Apart from searching the text string, this command is useful in:
      • Displaying all lines not containing the specified string @ /V
      • Displaying only the number count of lines containing the text string @ /C
      • Displaying line numbers with the displayed lines @ /N
    9. SORT

      This command is used to arrange the data of a file in alphabetical order (A-Z, 0-9) or reverse alphabetical order.

      Syntax is SORT   [/R]   [[drive1:][path1]filename1]   [/T [drive2:][path2]]  [/O [drive3:][path3]filename3] 

      /R in command line reverses the sort order; that is, the data of the specified file sorts sorts Z to A, then 9 to 0. [drive1:][path1]filename1 specifies the file to be sorted. /T [drive2:][path2] is used in cases of data overflow in main memory and it specifies the path of the directory to hold the sort's working storage. And /O [drive3:][path3]filename3 specifies the file where the sorted input is to be stored.


              Try it yourself and post in your valuable comments.

    How to Delete Undeletable Files in Windows .........

    It happens quite often that you want to delete a non-required file and it does not get deleted by normal method. When you try removing it by the normal delete method a message saying 'Error Deleting File or Folder' pops out saying that it cannot delete the file as the file is already in use. In such case you need to make sure that the file is not being used by some other program or it is not write protected.


    The other variants of this error message include:

    Cannot delete file: Access is denied
    There has been a sharing violation.
    The source or destination file may be in use.
    The file is in use by another program or user.
    Make sure the disk is not full or write-protected and that the file is not currently in use.

    If your are certain that the file is not write protected then here is the how you can safely delete the file:
     

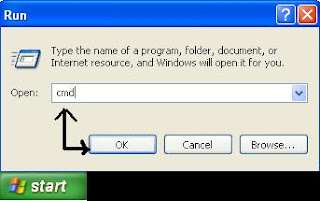
    1. Go to Start-->Run... and type CMD (or) COMMAND and press OK which open the command prompt window. Leave it open and make sure you close all other running applications.

    2. Go to Run dialog box again and type TASKMGR.EXE and press OK to access the task manager. (alternatively you can also use the keyboard shortcut Ctrl+Alt+Del to go to task manager)


    Now go to Processes tab and End Process named 'explorer.exe' by right clicking on it and choosing End Process. 

    3. Shuffle back to Command prompt without closing the task manager window. (Use Keyboard shortcut Alt+Tab). Now using DEL command, delete the file.

    Syntax:
    --> At the command prompt if you are in the same directory as of the file you wanted to delete, just give the following command at the command prompt

    DEL    (filename).(extension)

    --> And if you are in the other directory, you have to specify the entire path of the file to delete it.

    DEL   (path of the file)\(filename).(extension)

    For example, if you want to delete a file named 'movie.flv' in your G: drive, and at the command prompt you are in the C: drive then the syntax to delete the file is

    DEL    G:\movie.flv

    4. Now, use Alt+Tab to go back to Task Manager and from the file menu choose New Task(Run...) and type explorer.exe and click OK in order to restart your Windows shell.

    That's it!! You have successfully removed the unwanted file from your PC.

    If you find the above method of deleting the file a bit difficult, then you have to use an amazing software called 'Unlocker' which can easily kill the processes that are using the file and unlock the file so that you can easily delete or edit it.

    To know more about this Unlocker Software, check out my previous post @ 
    How-To Overcome 'Problem Ejecting USB Mass Storage Device' error........
    where I have clearly explained how it works.

    Hope this helps...

    Try it yourself and post in your valuable comments.

    How to Overcome Problem Ejecting USB Mass Storage Device Error......

    This error might have been faced by all USB drive users at one time or the other when trying to eject it.


    This sought of condition occurs when some application/process from your USB drive is being accessed/used by your system or when any application in the USB drive is running or else it may also show up when some virus files are running in your drive.

    How-To Overcome (after each step try ejecting, if it's not ejecting successfully then go to next step)


    1) Scan your USB drive with the latest updated anti-virus software and clean the infected files if any.

    2) Close all the applications in your USB drive.
    unlocker

    3) Unlock the files that the OS is using from your pen drive and all the process that are running from your USB drive with the help of a very small and efficient software called UNLOCKER. 


    USAGE:: 

    After installing the software Goto My Computer and righclick on your USB drive, which gives you a shortcut menu, there you get to see the 'Unlocker' option (shown below)click on it.


    Then you get the Unlocker window showing all the process running and the process path and other details.
    Click on Unlock all (shown below)


    Thats it!! Now Eject and there will be no problem.

    Hope this helps.. try it yourself and post in your valuable comments


    How To Block viruses from entering your USB drive.....

    USB drives are the most popular virus carriers these days. Here is the simple yet powerful command prompt trick with which you can create a dummy file that can block any incoming virus to your Pen drive.


    1. Note down the free space in bytes left in your USB drive. To do that, just right-click with your mouse on your USB drive and select properties where you can find the Used space and free space shown in bytes.


    2. Go to start-->Run... and Type cmd and click Ok to open the command prompt(DOS) window.

    3. At the command prompt type the command having the syntax as follows:

    fsutil file createnew [USB drive path\filename] [free space in bytes]

    for example, if the drive letter for your USB drive is 'K', the free space available is 1528864758 bytes and filename you want to use is dummyfile then the command you have to type is:

    fsutil file createnew k:\dummyfile 1528864768 

    As soon as you press ENTER after giving this command a file will be created in you USB drive occupying all the free space available.


    Now your USB drive cannot accommodate any incoming viruses as it has zero free space. You can check that from your drive properties. As you can see in the image below the free space left is zero as we have created a dummy file with all the free space available in the step above.


    And whenever you want to copy files to your USB drive from secured sources, just delete that dummyfile created and copy the data you wanted and again create a dummyfile that occupies the remaining free space.

    This command prompt trick is the best preventive measure to block any virus form entering your USB drive.

    Hope this helps...

    Try it yourself and post in your valuable comments.


    Saturday

    Aircel India now selling the iPhone 3GS for just Rs 9999

    Popular Indian carrier Aircel today announced on their Facebook page that they are now selling the Apple iPhone 3GS, for a super low price of Rs 9999.

    There’s a catch though. It’s only for postpaid users, and you have to pay Rs 3000 upfront as a security deposit, but you’ll get unlimited data on 2G or 3G (depending on availability) for a year. From Rs 19,999 to just Rs 9999 for a factory unlocked iPhone 3GS. Not too bad at all, eh?

    My dad still uses an iPhone 3GS and he’s incredibly happy with it. This is going to seriously affect the current mid-range Android phones, since folks might prefer an iOS experience even if it’s a 3 year old device, to the latest Android phones. Incase you need a reminder, the iPhone 3GS features a 3.5 inch display that’s not retina resolution but instead is 320×480 pixels, powered by an 800Mhz processor, 256MB of RAM, 8GB of storage (starting at), and a 3 Megapixel camera.
    More info over at Aircel’s website at the link below (currently not loading, I guess they couldnt handle the mad rush for it, heh).

    Gameloft’s The Dark Knight Rises game released on iOS and Android

    Hells yeah, I’ve been waiting for this one, for a while. Gameloft’s The Dark Knight Rises game for iOS and Android is now available to download from the respective App Stores.

    Right alongside the release of the movie too. As you can imagine, the game takes place in an open Gotham city enviroment, similar to the recently released The Amazing Spiderman game, where you can practically go anywhere and beat up mostly anyone, heh. Or so I’d expect. It follows the plot of the movie, but Gameloft has stated that it will not have any spoilers to ruin the movie for you incase you havent watched it yet.

    For Details Watch This Video:

    Available for $6.99 on the App Store and Google Play Store.

    Thursday

    LG L series (L7, L5 and L3) launched in India [Rs 19,900, Rs 13,199 and Rs 8895]


    Along with the Optimus 4X HD, LG India also launched their L series Android devices in the country today: The L7, L5 and L3 for Rs 19,900, Rs 13,199 and Rs 8895 respectively.

    The L7 features a 4.3 inch NOVA display at WVGA resolution (D’oh), 1Ghz processor, 5 Megapixel camera, 4GB of internal memory and runs Android 4.0 Ice Cream Sandwich with LG’s Optimus UI v3.0 on top.


    The L7 features a 4.3 inch NOVA display at WVGA resolution (D’oh), 1Ghz processor, 5 Megapixel camera, 4GB of internal memory and runs Android 4.0 Ice Cream Sandwich with LG’s Optimus UI v3.0 on top.


    And finally the L3 is the most affordable of the three, with a 3.2 inch display at 240×320 pixels, an 800MHz processor, 3 Megapixel camera, and runs Android 2.3 Gingerbread (D’oh).

    Related Posts Plugin for WordPress, Blogger...

    TECH 4 COMPUTER Headline Animator